Excel Guide Unhide All Rows Using Simple Tricks and Shortcuts

April 13, 2026 | 12 minutes | 645 Readers

Hidden rows in Microsoft Excel can be frustrating when you cannot find important data that seems to have disappeared. This issue often occurs when rows are hidden manually, filtered out, or affected by formatting settings that make them invisible. As a result, it can disrupt your workflow, cause confusion, and even lead to errors in your analysis. Whether you are working with large datasets or simple spreadsheets, missing rows can make it difficult to get a complete view of your

rating

Bestselling Course

View Details SAVE 94% NOW
Excel Guide Unhide All Rows Using Simple Tricks and Shortcuts

Hidden rows in Microsoft Excel can be frustrating when you cannot find important data that seems to have disappeared. This issue often occurs when rows are hidden manually, filtered out, or affected by formatting settings that make them invisible. As a result, it can disrupt your workflow, cause confusion, and even lead to errors in your analysis.

Whether you are working with large datasets or simple spreadsheets, missing rows can make it difficult to get a complete view of your information. Many users struggle to identify whether the issue is caused by filters, row height settings, or hidden formatting, which can waste valuable time trying to fix the problem.

In this guide, you will learn quick and simple ways to unhide all rows in seconds. From using basic Excel features to applying handy shortcuts, these methods will help you restore your data efficiently and keep your workflow smooth and organised.

What Does “Hidden Rows” Mean in Excel?

Hidden rows in Microsoft Excel refer to rows that are temporarily concealed from view within a worksheet. These rows are not deleted—they still exist in the spreadsheet and retain all their data, formulas, and formatting. Hiding rows is a simple way to manage large datasets, allowing users to focus only on the information that is currently relevant.

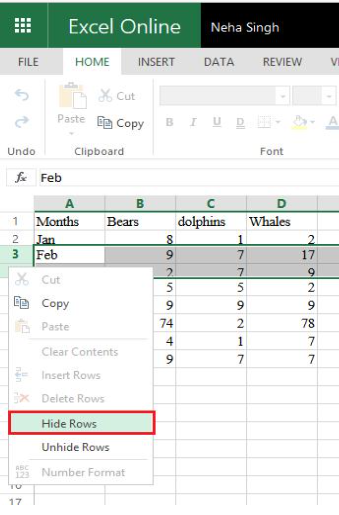
There are two main types of hidden rows in Excel. Manually hidden rows occur when a user deliberately hides specific rows using the “Hide” option or by adjusting row height to zero. These rows remain hidden until the user chooses to unhide them. On the other hand, filtered rows are hidden automatically when filters are applied to a dataset. In this case, Excel temporarily displays only the data that meets certain criteria, while the rest of the rows are hidden from view.

Users often hide rows to improve organisation and create a cleaner, more focused worksheet. This can be particularly useful when working with large datasets, reports, or dashboards, where unnecessary details may distract from key insights. By hiding rows, users can streamline their view, making data easier to read, analyse, and present without permanently removing any information.

How to Unhide All Rows in Excel (Step-by-Step Methods)

How to Unhide All Rows in Excel (Step-by-Step Methods)

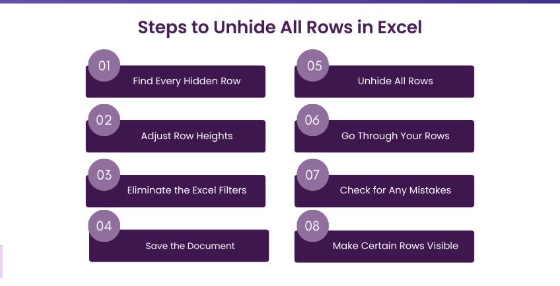
Hidden rows in Excel can quickly disrupt your workflow, especially when important data seems to disappear without warning. This often happens due to manual hiding, filters, or formatting issues. The good news is that Excel offers several quick and simple ways to bring those hidden rows back.

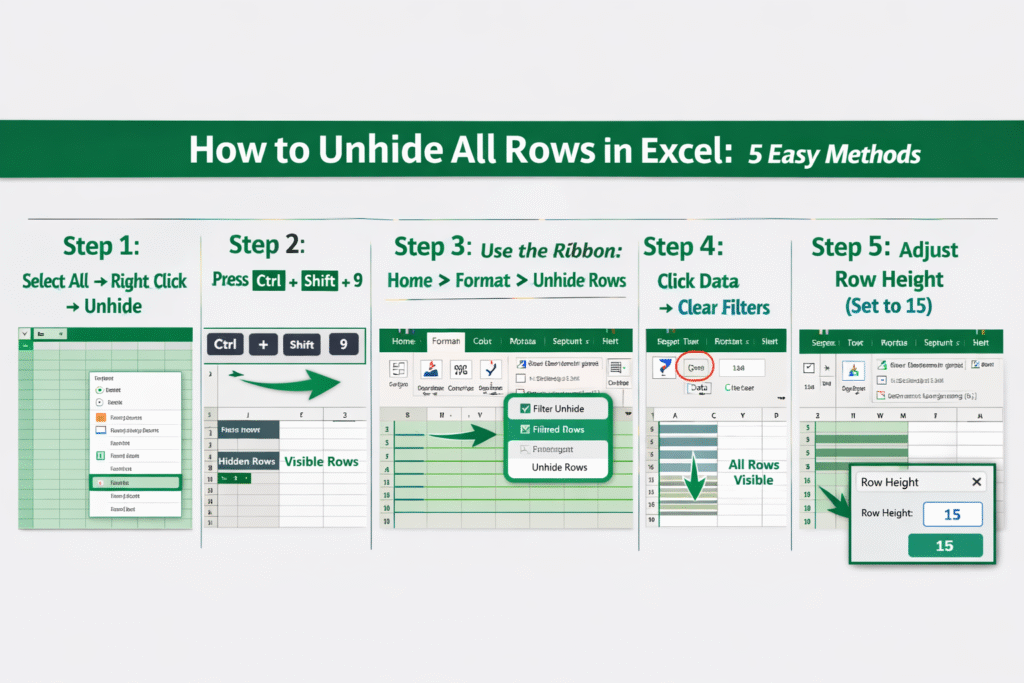
In this guide, you’ll learn five easy methods to unhide all rows in Excel—whether you prefer using shortcuts, menus, or manual fixes. Each method is beginner-friendly and can be applied in just a few seconds.

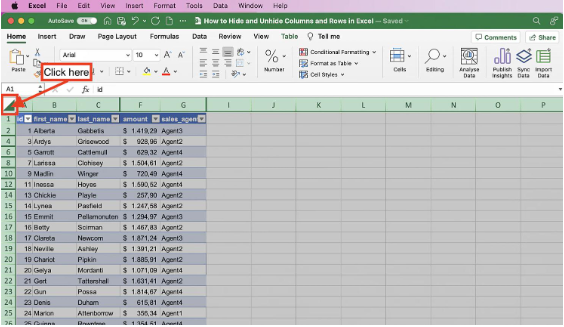
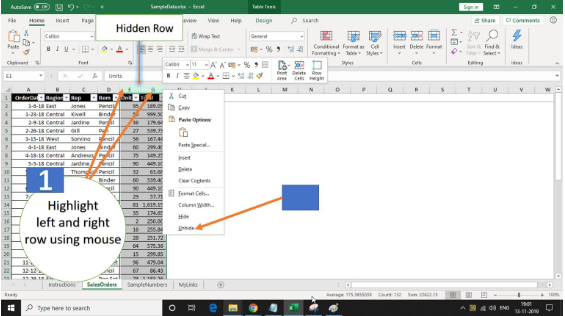
Method 1: Using Select All + Right Click (Best for Beginners)

This is one of the simplest ways to unhide rows in Excel.

Steps:

  • ♦  Press Ctrl + A to select the entire worksheet
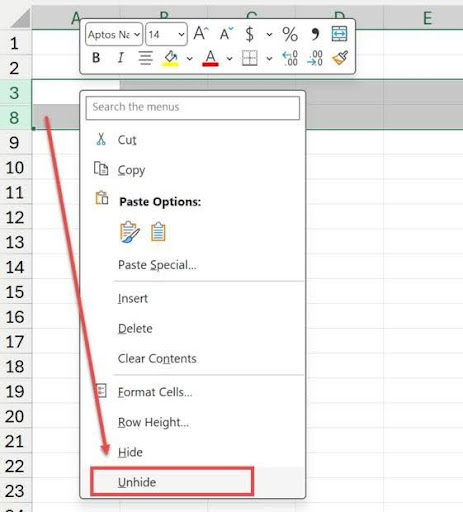
  • ♦  Right-click anywhere on the selected area
  • ♦  Click Unhide

Why use this?
It’s quick, easy, and perfect if you’re new to Excel.

Method 2: Using Keyboard Shortcut (Fastest Method)

If you prefer speed, this method is the most efficient.

Steps:

  • ♦  Select all rows using Ctrl + A
  • ♦  Press Ctrl + Shift + 9

Why use this?
It’s the fastest way to unhide rows without using a mouse.

Find the Course That Suits You!

We create outstanding professionals in Employability, Business, Health Care, Marketing, Language, and Functional Skills. Whether you're starting or advancing your career, we turn your passion into success as the UK’s most trusted e-learning course provider.
5000+ course

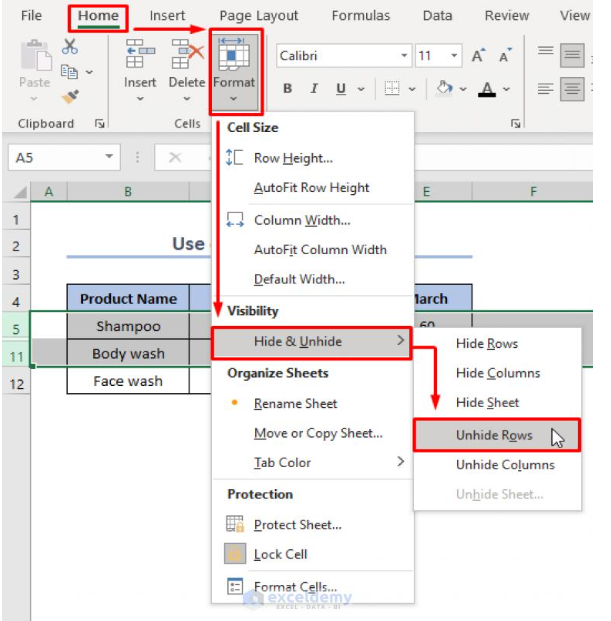
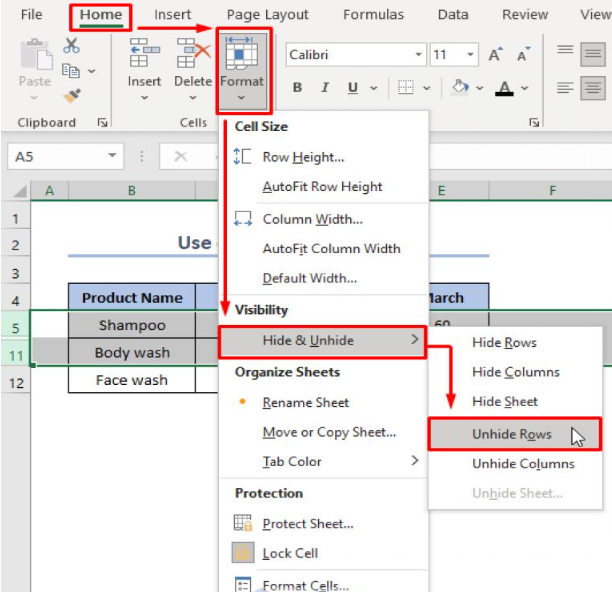
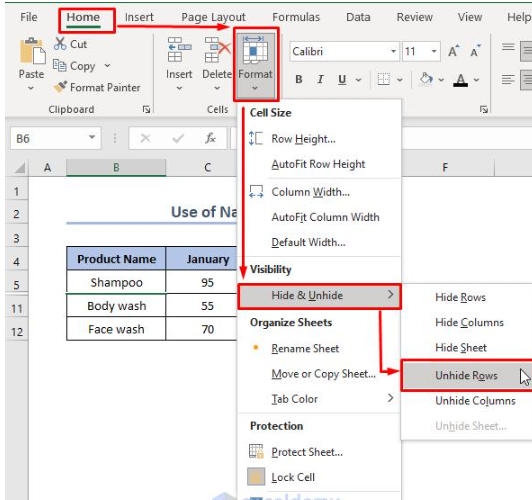
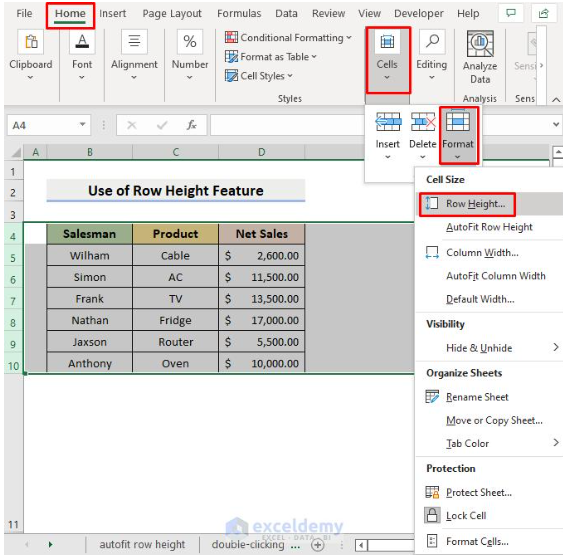
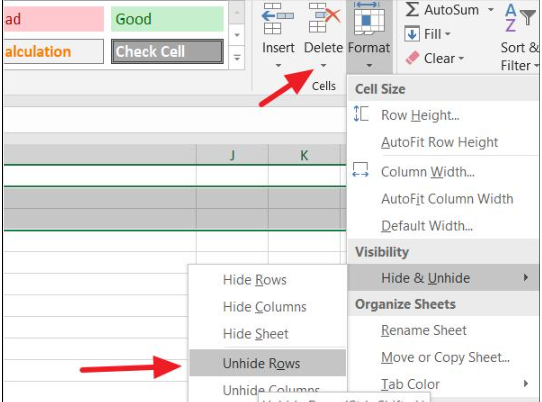
Method 3: Using the Ribbon Menu (Ideal for Visual Learners)

This method uses Excel’s built-in menu options.

Steps:

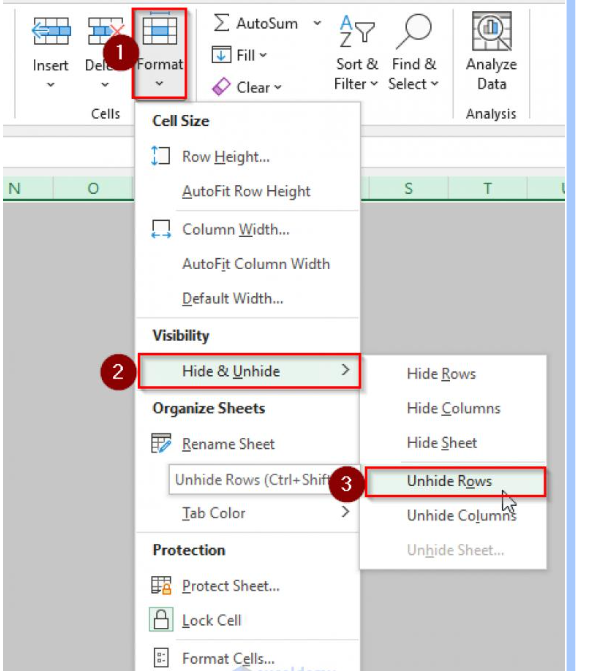
  • ♦  Go to the Home tab
  • ♦  Click Format
  • ♦  Select Hide & Unhide
  • Click Unhide Rows

Why use this?
It’s clear and visual, making it easy to follow step by step.

Method 4: Remove Filters to Unhide Rows

Sometimes rows aren’t hidden—they’re filtered out.

Steps:

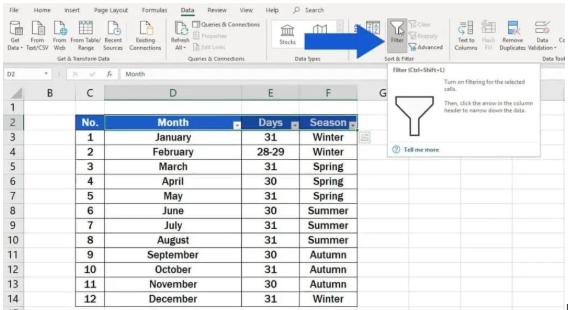
  • ♦  Go to the Data tab
  • ♦  Click Clear or turn off filters

Why use this?
Essential when rows are hidden due to filtering rather than manual hiding.

Method 5: Adjust Row Height (Fix Invisible Rows)

In some cases, rows may have a height of zero, making them invisible.

Steps:

  • ♦  Select the affected rows
  • ♦  Right-click and choose Row Height
  • ♦  Enter a value (e.g., 15) and apply

Why use this?
Useful when rows appear hidden but are actually just collapsed.

Why You Can’t Unhide Rows

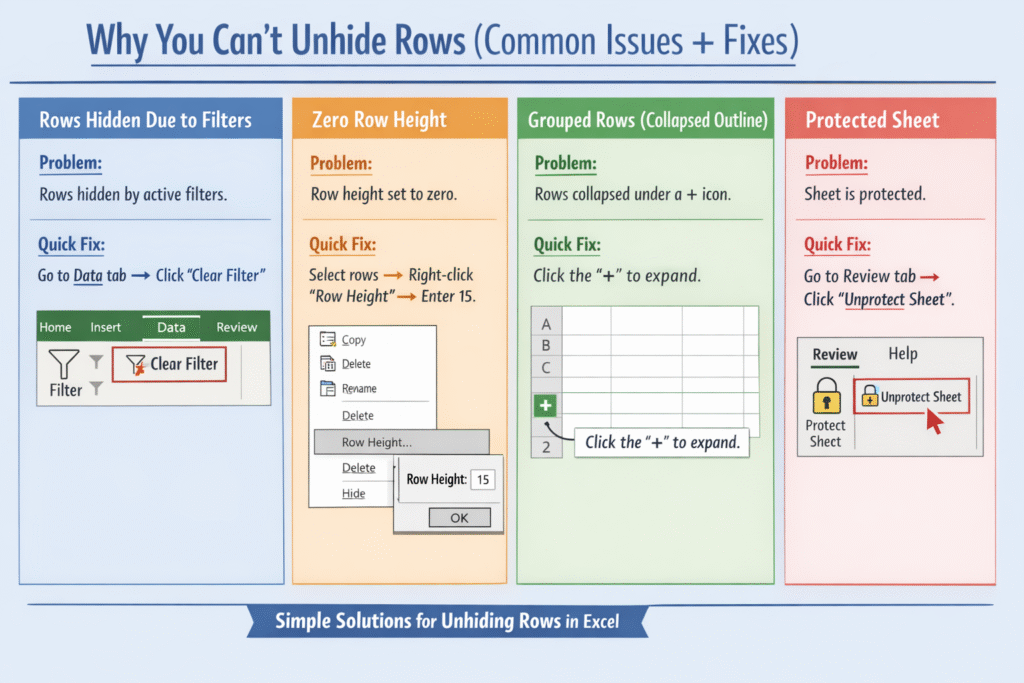
Why You Can’t Unhide Rows (Common Issues + Fixes)

Sometimes, even after trying the usual “Unhide” option in Excel, your rows remain hidden. This can be frustrating, especially when you’re unsure what’s causing the issue. In most cases, the problem is linked to specific settings like filters, formatting, grouping, or sheet protection. The good news is that each of these issues has a quick and simple fix.

Below are the most common reasons why you can’t unhide rows in Excel—along with easy solutions:

1. Rows Hidden Due to Filters

Problem:
When filters are applied, some rows may appear hidden because they don’t match the filter criteria.

Quick Fix:
Go to the Data tab → Click Clear Filter or select Filter and remove all applied filters. This will instantly bring back all hidden rows.

2. Zero Row Height

Problem:
Rows may not actually be hidden—they could have a height set to zero, making them invisible.

Quick Fix:
Select the rows above and below the missing area → Right-click → Click Row Height → Enter a value like 15 → Press OK.

3. Grouped Rows (Collapsed Outline)

Problem:
Excel allows rows to be grouped and collapsed, which hides them under a plus (+) sign.

Quick Fix:
Look for the + icon on the left side of the worksheet → Click it to expand the grouped rows.
Alternatively, go to the Data tab → Click Ungroup if needed.

4. Protected Sheet

Problem:
If the worksheet is protected, you may not be able to unhide rows.

Quick Fix:
Go to the Review tab → Click Unprotect Sheet → Enter the password (if required).
Once unprotected, you can unhide rows normally.

Pro Tips for Managing Hidden Rows in Excel

Pro Tips for Managing Hidden Rows in Excel

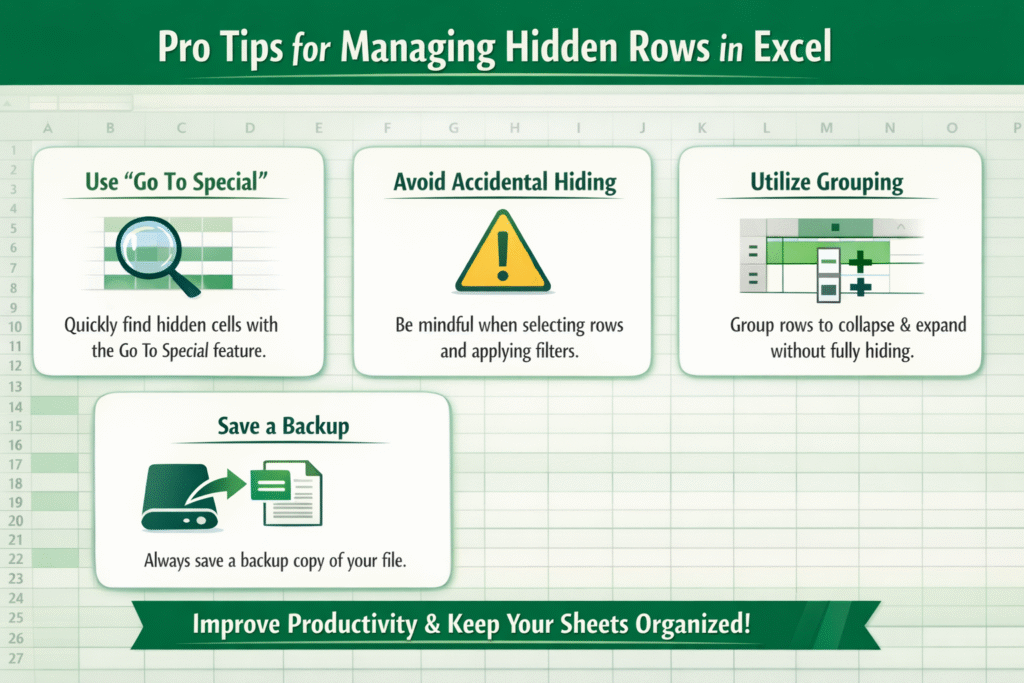
Hidden rows in Excel can easily disrupt your workflow, especially when important data seems to disappear without warning. Many users struggle to locate hidden cells or unintentionally hide rows while working with large spreadsheets. However, with the right techniques, you can manage hidden rows more efficiently and avoid common mistakes.

One of the most effective methods is using the “Go To Special” feature to quickly identify hidden cells. This tool allows you to select visible or hidden elements within your worksheet, making it easier to locate missing data without manually scanning through rows. It saves time and ensures accuracy when working with complex datasets.

To prevent issues in the first place, it’s important to avoid accidental hiding. This often happens when rows are mistakenly collapsed or when filters are applied incorrectly. Being mindful while selecting rows and regularly checking your sheet layout can help you maintain better control over your data.

Instead of hiding rows, consider using grouping as a smarter alternative. Grouping allows you to expand or collapse sections of your worksheet without fully hiding them, giving you better visibility and organisation. It’s especially useful when working with large reports or structured data.

Finally, always save a backup version before making changes to large spreadsheets. This ensures that you can easily restore your data if anything goes wrong. By following these pro tips, you can manage hidden rows in Excel more effectively, improve productivity, and maintain clean, well-organised worksheets.

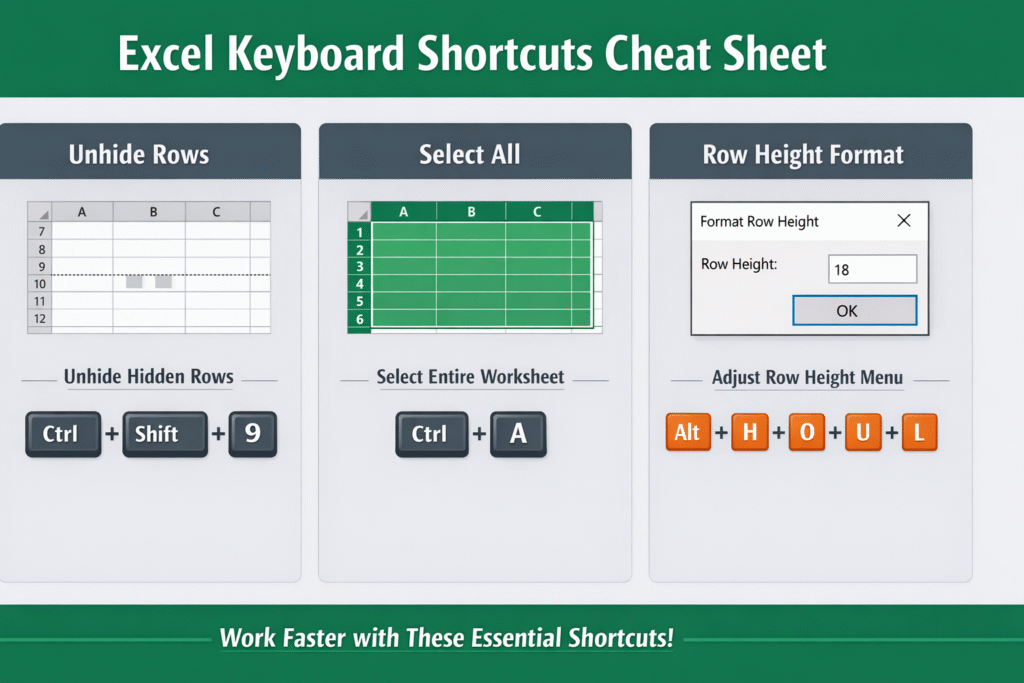
Keyboard Shortcuts Cheat Sheet Working efficiently in Excel often comes down to how well you use keyboard shortcuts. Instead of navigating through multiple menus, a few simple key combinations can save time and improve productivity. This cheat sheet highlights essential shortcuts that help you manage hidden data, select information quickly, and access formatting tools with ease. One common issue users face is dealing with hidden rows. Rather than searching through menus, you can instantly reveal them using a quick shortcut. To unhide rows, simply press Ctrl + Shift + 9. This is especially useful when working with filtered or manually hidden data, allowing you to restore visibility in seconds. Selecting data is another frequent task in Excel. To quickly highlight everything in your worksheet, use Ctrl + A. This shortcut helps you work faster when applying formatting, copying data, or performing bulk actions without manually dragging your cursor. For advanced formatting options, Excel provides a sequence-based shortcut. To open the format menu for row height, press Alt + H + O + U + L in order. This allows you to adjust row settings efficiently without leaving your keyboard, making your workflow smoother and more professional. By mastering these simple shortcuts, you can navigate Excel more confidently, reduce repetitive actions, and complete tasks much faster.

Keyboard Shortcuts Cheat Sheet

Working efficiently in Excel often comes down to how well you use keyboard shortcuts. Instead of navigating through multiple menus, a few simple key combinations can save time and improve productivity. This cheat sheet highlights essential shortcuts that help you manage hidden data, select information quickly, and access formatting tools with ease.

One common issue users face is dealing with hidden rows. Rather than searching through menus, you can instantly reveal them using a quick shortcut. To unhide rows, simply press Ctrl + Shift + 9. This is especially useful when working with filtered or manually hidden data, allowing you to restore visibility in seconds.

Selecting data is another frequent task in Excel. To quickly highlight everything in your worksheet, use Ctrl + A. This shortcut helps you work faster when applying formatting, copying data, or performing bulk actions without manually dragging your cursor.

For advanced formatting options, Excel provides a sequence-based shortcut. To open the format menu for row height, press Alt + H + O + U + L in order. This allows you to adjust row settings efficiently without leaving your keyboard, making your workflow smoother and more professional.

By mastering these simple shortcuts, you can navigate Excel more confidently, reduce repetitive actions, and complete tasks much faster.

Real-Life Use Cases

Real-Life Use Cases

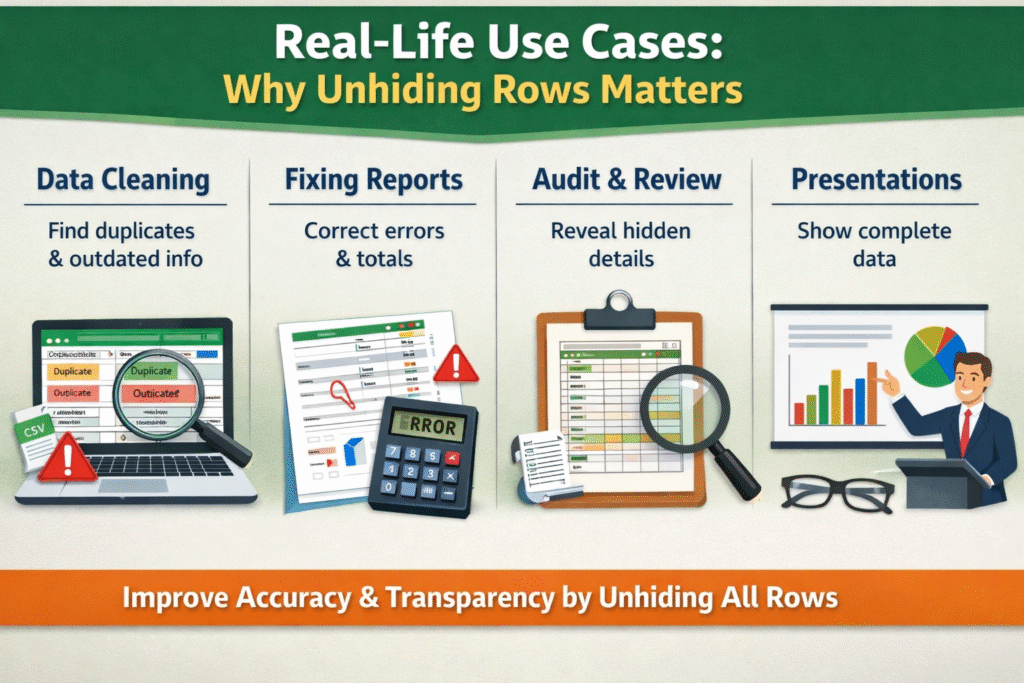
Understanding how to unhide rows in Excel becomes truly valuable when applied to real-world scenarios. In everyday tasks, hidden rows often lead to confusion, missed data, and inaccurate results. By mastering simple techniques to reveal hidden information, you can improve accuracy, efficiency, and overall data management.

While cleaning large datasets, hidden rows can contain duplicate, outdated, or unnecessary data that must be reviewed before analysis. Unhiding all rows ensures nothing is overlooked, allowing you to organise and clean your data properly. This is especially useful when working with imported data or shared files where changes may not be immediately visible.

During the process of fixing reporting errors, hidden rows are a common cause of incorrect totals or missing figures. Revealing all rows helps you identify inconsistencies, correct formulas, and ensure your reports are accurate. This step is essential before finalising any business or financial report.

As part of auditing spreadsheets, visibility is essential. Hidden rows may contain critical information, notes, or historical data that affect decision-making. Unhiding everything allows for a complete review, helping you verify data integrity and maintain transparency, especially in professional or compliance-related tasks.

When preparing data for presentations, clean and fully visible datasets make a strong impression. Unhiding rows helps you present complete and reliable information, ensuring your charts, tables, and summaries reflect the full picture. This leads to clearer insights and more confident decision-making.

Conclusion

Unhiding rows in Excel becomes effortless once you understand the key methods, whether using the ribbon options, keyboard shortcuts, or adjusting row height. These simple techniques help you quickly restore hidden data and maintain a clear, organised worksheet without frustration. Unhiding rows in Excel is quick once you know the right tricks, saving both time and effort in your daily tasks. Want to master Excel faster? Explore more tips and guides to boost your productivity and confidence.

FAQs — Excel Guide Unhide All Rows Using Simple Tricks and Shortcuts

Q1: Why are my rows not unhiding in Excel?
Rows may not unhide due to active filters, very small row height, or worksheet protection. Clear any filters, adjust the row height manually, or remove sheet protection to fix the issue.

Q2: How do I unhide all rows at once?
Select the entire sheet using the top-left corner button or press Ctrl + A, then right-click on any row number and choose “Unhide.” This reveals all hidden rows instantly.

Q3: Can filters hide rows in Excel?
Yes, filters can temporarily hide rows that don’t meet specific criteria. Unlike manually hidden rows, filtered rows reappear automatically when the filter is cleared.

Q4: What is the fastest way to unhide rows?
The quickest method is using the shortcut: select the rows around the hidden section and press Ctrl + Shift + 9 to unhide them immediately.

Q5: How do I unhide rows in protected sheets?
If the sheet is protected, you won’t be able to unhide rows without permission. You need to unprotect the sheet using the correct password or request access from the file owner.

Find the Course That Suits You!

We create outstanding professionals in Employability, Business, Health Care, Marketing, Language, and Functional Skills. Whether you're starting or advancing your career, we turn your passion into success as the UK’s most trusted e-learning course provider.
5000+ course
Sam Walker

Article by

Sam Walker

Sam Walker is an education specialist and author at One Education, bringing over 4 years of experience in creating practical resources and strategies to support teachers and enhance student learning.

top

Hear What Our Learners Say About Us

Home Courses Search